
How to make your own carts with distillate
A guide for how to turn distillate into your own vape cartridges. UK based information with UK suppliers.
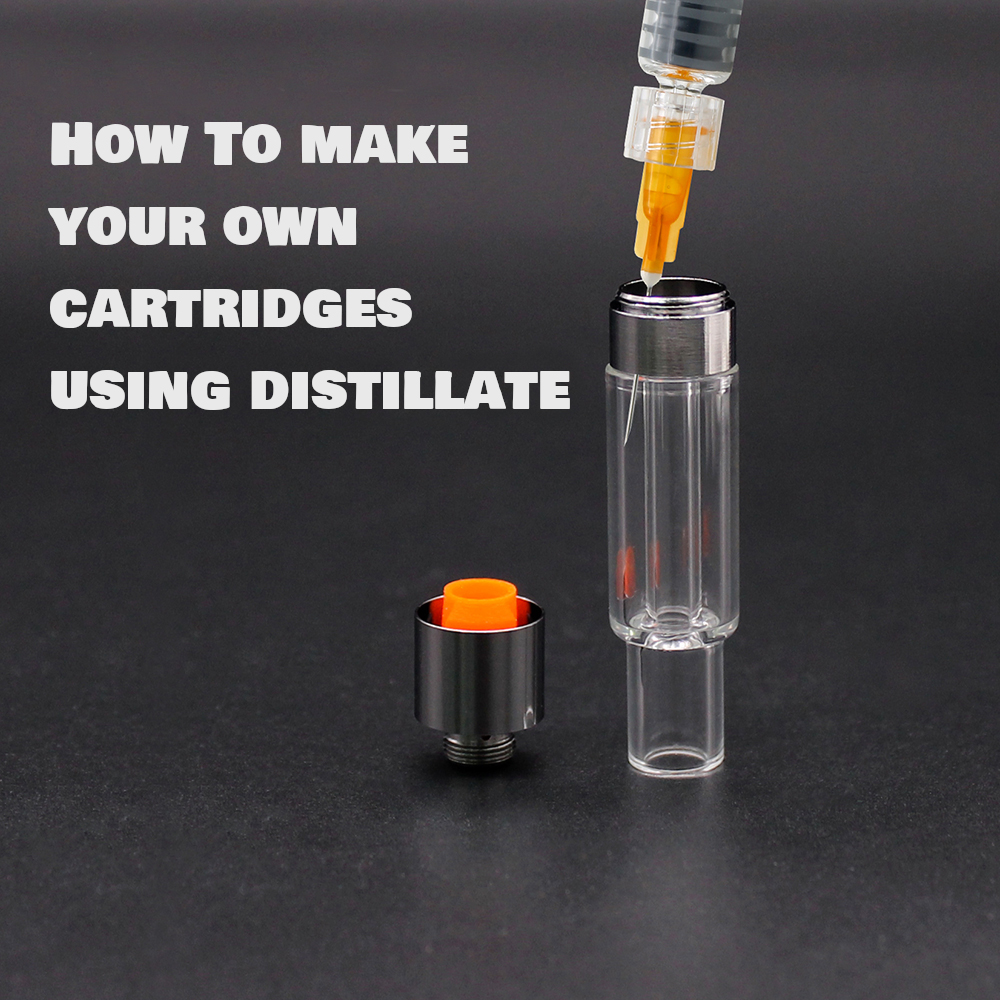
Creating your own distillate carts is as easy as:
Get your distillate
Melt it down
Add terpenes 5-10% (optional)
Use syringe or cart filler to fill up empty cart
Screw / push cart tip on
How to make carts using other extracts
Do you have other extract to use? Such as: Live Resin, Terp Sauce, Diamonds, Wax, Budder, Crumble, Shatter? then please see our guide here: Making vape carts from cannabis extract
How to Make Your Own Carts with Distillate
Vaping has become a popular way to consume cannabis, offering convenience and discreetness for enthusiasts. While pre-filled cartridges are readily available in the market, some users prefer the option to create their own carts with distillate. This article will guide you through the process of making your own carts, providing step-by-step instructions and useful tips for a successful DIY experience.
Understanding Distillate
What is distillate?
Distillate is a highly concentrated form of cannabis extract known for its purity and potency. It is produced through a process called distillation, which involves separating and refining specific compounds from the plant material. Distillate is often rich in cannabinoids like THC (tetrahydrocannabinol) or CBD (cannabidiol) and has a clear, viscous consistency. Please ensure to follow laws in your local area when doing so.
How is distillate made?
Distillate is typically created by extracting cannabinoids and other desired compounds from cannabis plant material using solvents like ethanol or CO2. The extracted oil is then purified and subjected to a distillation process that removes impurities, resulting in a clean and potent final product.
Benefits of Making Your Own Carts with Distillate
There are several advantages to making your own carts with distillate:
Quality Control: When you create your own carts, you have full control over the quality of the distillate and the ingredients used. This ensures that you know exactly what you are vaping and can avoid potential contaminants.
Cost-Effectiveness: Purchasing pre-filled cartridges can be expensive, especially when you consider the markup and additional costs. Making your own carts with distillate can be a cost-effective alternative, allowing you to save money in the long run.
Customization Options: DIY carts offer a world of customization possibilities. You can experiment with different strains, flavours, and concentrations to tailor the vaping experience to your preferences.
Things You’ll Need
Before you embark on the journey of making your own carts, gather the following items:
Distillate: Acquire a high-quality distillate that suits your desired potency and cannabinoid profile. Ensure that it is free from any additives or contaminants.
Empty Vape Cartridges: Purchase empty cartridges specifically designed for vaping. Look for ones that are compatible with your distillate and have good reviews regarding their performance and durability. All of the carts we sell on UK Vape Carts are suitable for distillate use.
Syringes or Cart Filling Gun: You’ll need a blunt-tip syringe or cart filling gun to load the distillate into your cartridge. For making DIY use on small batches, syringes are the cheapest option. If you prefer to fill in bulk amounts over 20-100 carts in a batch then a cart filling gun is a wise investment.
Glass Beaker or any Heat Resistant Container: A small heat-resistant mixing container such a glass beaker to hold your distillate mix, could also be a small glass heat proof jar or bowl.
Heat Source: The cheapest option would be a simple Bain Marie style water bath. Using a kitchen hob to apply heat into a pan, and glass jar with your distillate contents within. This type of option requires care and safety of kitchen appliances. A better heat source is a ceramic hot plate. This allows digital control over the heat you apply for much more control and also has a magnetic stirring feature, allowing easy blending of your mix.
Terpenes : If you prefer flavoured carts, you can choose from a wide range of cannabis-derived or food-grade terpene blends. These can enhance the taste and aroma of your vaping experience. For most terpenes you will want to only use small amounts, generally 5% or so of your total. Example if you have 20ml of CBD distillate, add around 1ml terpenes.
Step-by-Step Guide to Making Your Own Carts with Distillate
Follow these steps to create your own carts with distillate:
Step 1: Preparing the Distillate
- Start by warming your distillate. Place the syringe or container holding the distillate in hot water for a few minutes, depending on your container even a microwave could work. Perhaps the easiest is to seal your distillate syringe/container using cling film or a plastic bag, then this can be safely placed inside a hot bowl of water for 5-10 minutes. Your goal will be to heat the distillate until its warm enough to pour.
- Once the distillate is warmed enough to be liquid, dispense into your glass beaker or glass jar, apply enough heat until its runny liquid (50c – 80c)
- Add your terpenes into your mix if desired, go for 5%-7% or so and mix until combined. See some further details about how to mix in your terpenes in this handy: mixing guide!. Mixing can be done by hand and a stir bar, but for larger quantities its advisable to use a magnetic stirrer which are found on many ceramic hotplate lab devices and makes the job of combining your mixture properly much easier.
- Don’t go too hot! when mixing else you will evaporate away the terpenes. Warm enough to blend but not too much. Try to work with your oil at around 50-55 °C when adding the terpenes to help maintain them and avoid evaporation. A common mistake is adding terpenes too hot for example over 80 °C+ and leaving for a while, would result in most of your terpenes boiling away resulting in weak flavour.
- Once your oil is ready you may need to bump up the temperature for a short time to help the oil become thin enough to syringe, if its too thick, try increasing the temp a little, baring in mind your oil will cool very quickly once in the syringe. Plastic disposable syringes are possible, but glass ones can be easier. Ensure to use luer lock syringes and most carts fill well using 14g – 16g dispensing needles. Best to fill only 1 or 2 carts worth of oil at at time, as it will harden very quickly and get stuck inside your syringe. Use the warmth of your hand to help a little here, or a hairdryer to help if stuck. For larger batches, recommended when producing 20+ cart batches, you might consider our Cart Filling Gun. Its a great idea to get used to handling the distillate and filling cartridges before upgrading to a filling gun, as the overall understanding is the same but the filling gun adds additional steps and is worth the time and effort only for larger batches vs a syringe method. However with the heated filling gun, you have the major benefit of the oil not cooling/hardening inside the syringe, allowing many more carts to be filled before needing to replenish the chamber. Our 25ml filling gun can fill 25 x 1ml carts or 50 x 0.5ml carts on each chamber full. So filling 100 carts assuming 0.5ml ones could be achieved with only 2 refills of the chamber. This is a lot faster than the 50 or so refills of a syringe would be to fill the same 100 carts.
Step 2: Filling the Cartridge
- Unscrew the mouthpiece of the cartridge to expose the chamber and have it ready first
- Draw the distillate into your syringe, recommend no more than 1 or 2 cartridges worth and then quickly begin filling, don’t hang around as be mindful your oil will cool quickly and harden within a very short time in a cool syringe. Some people warm the syringe up first before drawing the distillate as this helps prevent hardening so quickly.
- Steadily fill the cartridge with the distillate, being mindful not to overfill. A good strategy here is to insert the filling needle as low as possible into the left most side of the cart, dispense around half the total volume, remove and re-insert into the right most side of the cart, and dispense the rest, this way allows an even dispense of the oil across the cartridge.
- Take your time to ensure an even distribution of the distillate within the cartridge. Some producers will put all of their carts upright after filling into a warm oven around 40-50°C to allow the oil to liquidise again and force all the bubbles out the top with minimal effort. Else another way is bubbles can be forced out by simply screwing the tip onto the cart, this will reduce the airgap once the tip is tightened on fully.
- Filling Tip! – almost all of our 0.5ml cartridges can actually hold 0.6ml if filled to the brim! So this means, if calculating for cartridges filled to the top with no bubble, then account for 0.6ml per cart rather than 0.5ml. However some producers opt for filing exactly 0.5ml which leaves a larger air bubble at the top.
Step 3: Sealing the Cartridge
- Once the cartridge is filled, replace the mouthpiece and make sure it is securely fastened.
- Leave upright to sit for at least 60 minutes to allow absorption into the coil. Some cartridge manufacturers recommend 4-6 hours, and 12-24 hours is even better. Failing to wait this time after filling your cartridge will produce burnt hits because the coil is not saturated and will produce very poor flavour.
- Sometimes if you have very thick oil you may see air bubbles forming that block the coil holes, leaving upright overnight will usually resolve, or a heatgun/hairdryer for a short time will also help.
Step 4: Testing and Troubleshooting
- Attach the cartridge to a compatible vape pen or battery or vape mod. Aim for low power around 4-6 watts or 2.0-2.2v to start with. Move up from there.
- Some cartridges use bottom airflow, be aware if your battery doesn’t support this then the fix is to slightly unscrew the cartridge, say 90% screwed in rather than 100% too allow an air gap for the bottom airflow to work
- Recommend to always pre-heat your cartridge before first use, all of the batteries we sell have this feature. This means the battery will run a low voltage to your cartridge for around 10 seconds or so, melting and warming up the oil and meaning its ready to be vaped. Failing to do this can often cause burnt taste or clogging.
- If your cartridge doesn’t produce much vapour, even at higher power settings, then consider thinning your blend down. If flavour is poor, consider adding adjusting the amount of terpenes in use.
- Be aware different oil blends perform differently on certain models of cartridges. Some testing is advised. In general our V4 models are the most compatible with various oil blends. Our Full Glass and Full Ceramic options require a more specific oil viscosity to work well, however once getting the blend right will generally perform better than the V4 models.
Best Practices and Tips for Making Your Own Carts
Consider the following tips to enhance your DIY cart-making experience:
Thinners and Additives : Generally we advise against using fillers or additives to your distillate other than high quality terpenes. They will weaken your blend, and some additives are harmful.
Storage and Shelf Life: Properly store your carts in a cool, dry place away from direct sunlight to preserve their potency and flavour. Store carts upright tip side up. Most cartridges have a shelf life of around six months to a year or more.
Experimenting with Flavours: If you enjoy experimenting with flavours, consider adding cannabis-derived or food-grade terpene blends to your distillate. Start with a small amount and gradually adjust to find your desired flavour profile. Try not use too much terpenes in your blend, going over 10% is usually too much terpenes.
Safety Precautions
Ensure your safety while making your own carts with distillate by following these precautions:
Working in a Well-Ventilated Area: Distillate and other cannabis extracts can emit strong odours and volatile compounds. It’s important to work in a well-ventilated space or near an open window to minimize exposure.
Handling Concentrated Substances: Take care when handling concentrated distillate to avoid any contact with your skin or eyes. Wear gloves and eye protection if necessary.
Conclusion
Making your own carts with distillate can be a rewarding and cost-effective hobby for cannabis enthusiasts. By understanding the process and following the steps outlined in this guide, you can have greater control over the quality, customization, and cost of your vaping experience. Experiment with different strains, flavours, and potency levels to create carts that perfectly suit your preferences.
Remember to prioritize safety by working in a well-ventilated area and handling concentrated substances with caution. With practice, you’ll gain confidence in your ability to create high-quality carts with distillate.
FAQs
1. Can I use any type of distillate for making carts?
Yes, you can use different types of distillate, such as HHC, H4CBD, THC or CBD distillate, depending on your preferences and desired effects. Ensure you follow the local laws in your area when buying or using distillate. Just ensure that the distillate you choose is of high quality and free from additives or contaminants.
2. How long does it take for the carts to be ready to use?
Once you have filled and sealed the cartridge, it should be ready after 60 minutes. Better is allow 24 hours before vaping to allow full time for ceramic coil saturation and any terpenes to dissolve in.
3. Is it legal to make my own carts with distillate?
The legality of making your own carts with distillate depends on the regulations and laws in your area. Generally CBD distillate is legal to use. Before engaging in any cannabis-related activities, it is important to familiarize yourself with the local laws and comply with them accordingly. UK Vape Carts only condones making lawful cartridges applicable to your area.
4. Can I reuse old cartridges for this process?
While it may be possible to reuse old cartridges, it is generally recommended to use new, clean cartridges for the best vaping experience. Reusing old cartridges can result in diminished performance and flavour. Most users find refilling a cartridge 1 or 2 times is around the most before the coil degrades too much.
5. Are there any risks associated with making carts at home?
When making carts at home, it is important to exercise caution and follow safety guidelines. Working with concentrated substances and using vaping devices involves certain risks. Ensure proper ventilation, handle the distillate carefully, and be mindful of potential hazards.